 M
M
Play Area
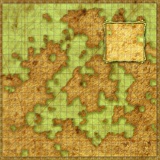
There's a ton of configurations that you can use to complete The Legend of Mana and get all of the goodies along the way. For this Walkthrough I have chosen the 'Round the Tree Again map configuration from the Map/Artifact Placement Guide, v2.5 by FDesroches / ANelson.
To place your AF's (Artifacts) efficiently you will need to pick a very specific location on the play area. See figure.
Artifact Order
If you are following the included Walkthrough, you should place your lands in the order listed below. This Land Placement Guide allows you to obtain the following (if you follow the event order exactly as listed):
- Access to all Events
- Access to all Mineral Shops
- Access to all Demi-Human Pets
- Highest level Weapon Shops
- Full Mana Levels in Orchard
- The Wimpy Thugling Event
-
1
Home Mailbox
-
2
Domina Colorblocks
-
3
Luon Highway Wheel
-
4
Gato Grottoes Flame
-
5
Mindas Ruins Ancient Tablet
-
6
Ulkan Mines Bottled Spirit
-
7
Junkyard Broken Doll
-
8
Mekiv Caverns Jade Egg
-
9
Tower of Leires Moon's Mirror
-
10
Lake Kilma Stone Eye
-
11
Lumina Firefly Lamp
-
12
Jungle Medallion
-
13
Duma Desert Sand Rose
-
14
Underworld Trembling Spoon
-
15
Norn Peaks Skull Lantern
-
16
Bone Fortress Dragon Bone
-
17
Fieg Snowfields Frozen Heart
-
18
Lucemia Brooch of Love
-
19
Tree of Mana Sword of Mana
-
20
Polpota Harbor Rusted Anchor
-
21
Orchard Golden Seed
-
22
Madora Beach Torch of Coral
-
23
Geo Tome of Magic
-
24
White Forest Green Cane
-
25
SS Buccaneer Pirate's Hook
-
26
Bejeweled City Jumi's Staff
- ×
- ×
- ×
- ×
- ×
- ×
- 25
- 24
- 16
- 15
- 14
- ×
- 22
- 20
- 17
- 23
- 12
- 18
- 10
- 13
- 19
- 11
- 8
- ×
- 9
- 26
- 2
- 21
- 7
- ×
- 4
- 3
- 1
- 5
- 6
- ×